Table of contents
- GoogleDialogFlow
- Key Terms
- QUICK TID BITS
- API Docs C# Client
- Intents
- Parameters
- GitHub
- Detect Intent
- Match Intent
- Fulfill Intent
- Webhooks
- WELCOME intent/ Default start call intent
- Events
- Agent Handoff
- Agent Responses
- Testing
- PostMan
- Quick Notes/References
GoogleDialogFlow
repo for GoogleDialogFlow
1.
Identify the roles, both the customers and your virtual agent, as well as all the potential use cases your virtual agent will need to address. Right
personas, both
for customers and virtual agents, so that conversations will take a natural shape. Model user agent interactions to help identify user requirements,
handle all
possible expected and don’t forget unexpected user scenarios, that could occur for your business.
2.
In order to understand why the customers reaching out to you, you’ll need to be able to break down the individual parts of the conversation. The
conversation will
include representative words and phrases, and you can use these to dissect and interpret the customer’s needs and how you respond. There are three
important parts
to a conversation. Intense, identifying what the customer needs or wants you to do for them. Entities, identifying a thing the customer is referring
to, and
parameters setting the variable of the thing the customer is referring to so that you can reference it later in the conversation.
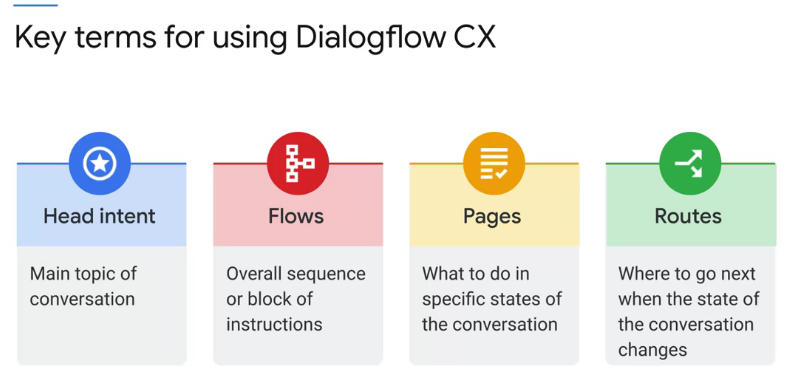
Key Terms
QUICK TID BITS
params
 $intent.params.user-input,
 $session.params.user-input,
 $page.params.valid-input,
  $page.params.status = "FINAL"
 $page.params.parameter-id.status = "UPDATED"
functions
 $sys.func.CONCATENATE($session.params.user-authentication-map-key, $session.params.user-input)
 $sys.func.JOIN(", ", $session.params.user-authentication-map)
 $sys.func.TO_TEXT($session.params.user-authentication-map)
 $sys.func.SUBSTITUTE("$sys.func.TO_TEXT($session.params.user-authentication-map)" , " { ", "PP")
 "$sys.func.ADD($session.params.verify-member-attempt, 1)"
($sys.func.GET_FIELD($session.params, phone-number) != null
    OR $sys.func.GET_FIELD($session.params, last-4-ssn) != null)
    AND $session.params.member-verified != true
    AND $sys.func.GET_FIELD($session.params, security-code) = null
$sys.func.ADD( $sys.func.TO_NUMBER( $session.params.total-questions-resolved) , $sys.func.TO_NUMBER( $session.params.resolved))"
when using func in parameter value be cognizant of quotation marks, they need to be there
$sys.func.IF("$session.params.account-found = null OR $session.params.account-found = false" , null , true)
$sys.func.IF("($session.params.current-flow = null AND $session.params.current-route = null)" , null, {name : $session.params.current-flow , route : $session.params.current-route} )
$sys.func.IF("$session.params.current-flow = null" , null , "{name : $session.params.current-flow , route : $session.params.current-route}")
{name : $sys.func.TO_TEXT($session.params.current-flow) , route : $sys.func.TO_TEXT($session.params.current-route)}
get the json key file from DialogFlow
- Once in the Google Cloud Platform, go to IAM & admin > Service account > Create service account
- Fill out the details of the service account and click on the button “create”
- Select “DialogFlow API Admin” in the field “Role”
- Now, once the creation of the service account is finalized, select it and click on “Create Key”
- Select JSON as “key type”
- Download the new private key in JSON
API Docs C# Client
Intents
A couple of things to look for:
- Note that as you enter your training phrase, Dialogflow CX will automatically annotate your entities. If it doesn’t do so, you may need to
update your entity (by adding a synonym) or by manually annotating the training phrase yourself.
Shorter training phrases: Dialogflow’s NLU system can also work with shorter training phrases and we have provided a couple of examples
here. - Over-training: Too many training phrases for an intent may cause over-training and a less desirable result. It is best practice to use
iterative and incremental testing and add in training phrases in the case that there isn’t an intent matched.
Parameters
Presets
You can use a fulfillment to provide presets that set or override current parameter values. These presets will be applied before resolving static
response messages or calling a webhook.
You can also use system functions to preset the parameter to a dynamically
generated value.
| Parameter | Value |
|---|---|
| now | $sys.func.NOW() |
| counter | $sys.func.ADD($session.params.counter, 1) |
| new-cost | $sys.func.IDENTITY($session.params.other-cost) |
| member-verified | $sys.func.IF(“$session.params.member-found-count < 2 AND $session.params.member-found = true”, true, false)” |
GitHub
- access token =
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
Create Repo
- GitHub repository URL:
(for example: https://api.github.com/repos/<repository_owner/>)
GitHub personal token. If you use a fine-grained personal access token, you need the > following permissions access:
Repository Permissions > Contents: Read and writeRepository Permissions > Metadata: Read-only (should be auto-selected after selecting Contents permission)
Detect Intent
You can use APIs or Client Libraries to set the queryParams.parameters and
queryParams.currentPage in the detectIntent method.
Detect Intent Request
{
  "queryInput": {
    "text": {
      "text": "test"
    },
    "languageCode": "en"
  }
}
trigger intent
{
  "queryInput": {
    "languageCode": "en",
    "intent": {
      "intent": "projects/vcu-virtual-assistant-bot/locations/global/agents/8ec51540-2933-43d6-aad5-355545059bfe/intents/335ebd4c-bb93-4ed1-bd4c-610789dbb7ea"
    }
  },
  "queryParams": {
    "timeZone": "America/Los_Angeles"
  }
}
trigger event
{
  "queryInput": {
    "event": {
      "event": "custom-event"
      // custom event to be triggered
    },
    "languageCode": "en"
  },
  "queryParams": {
    "timeZone": "America/Los_Angeles"
  }
}
Set params and current page
Here’s a sample reference using REST API to set
the QueryParameters ofthe detectIntent
method request body:
{
  "queryParams": {
    "parameters": {
      "param1": {
        "value": "sample1"
      },
      "currentPage": "projects/<Project ID>/locations/<Location ID>/agents/<Agent ID>/flows/<Flow ID>/pages/<Page ID>"
    }
  }
}
Detect Intent Response
{
  "responseId": "bda416d2-134c-4bbb-a0a1-37820eb0257e",
  "queryResult": {
    "text": "test",
    "languageCode": "en",
    "parameters": {
      "session-id": "a57d22-fbe-afb-ee4-69a8f62b3",
      "session-url": "projects/vcu-virtual-assistant-bot/locations/global/agents/8ec51540-2933-43d6-aad5-355545059bfe/environments/ec5f3114-e5d6-497f-bf92-53723c698230/sessions/a57d22-fbe-afb-ee4-69a8f62b3"
    },
    "responseMessages": [
      {
        "text": {
          "text": [
            "When you test me that helps my developers improve my performance."
          ],
          "allowPlaybackInterruption": true
        }
      },
      {}
    ],
    "currentPage": {
      "name": "projects/vcu-virtual-assistant-bot/locations/global/agents/8ec51540-2933-43d6-aad5-355545059bfe/flows/00000000-0000-0000-0000-000000000000/pages/START_PAGE",
      "displayName": "Start Page"
    },
    "intent": {
      "name": "projects/vcu-virtual-assistant-bot/locations/global/agents/8ec51540-2933-43d6-aad5-355545059bfe/intents/3a13ea29-83bd-4131-9144-2f511b42fcc2",
      "displayName": "small_talk.user.testing_agent"
    },
    "intentDetectionConfidence": 1,
    "diagnosticInfo": {
      "Transition Targets Chain": [
        {
          "TargetFlow": "7bf60f85-19fe-48bd-ac27-2b5db2cde4de"
        },
        {
          "TargetPage": "END_FLOW"
        }
      ],
      "Session Id": "a57d22-fbe-afb-ee4-69a8f62b3",
      "Triggered Transition Names": [
        "807b27e2-59da-4a37-8b1c-c7d109cb816f",
        "807b27e2-59da-4a37-8b1c-c7d109cb816f"
      ],
      "Execution Sequence": [],
      "Alternative Matched Intents": [
        {
          "Active": true,
          "Id": "3a13ea29-83bd-4131-9144-2f511b42fcc2",
          "Type": "NLU",
          "Score": 1,
          "DisplayName": "small_talk.user.testing_agent"
        }
      ]
    },
    "match": {
      "intent": {
        "name": "projects/vcu-virtual-assistant-bot/locations/global/agents/8ec51540-2933-43d6-aad5-355545059bfe/intents/3a13ea29-83bd-4131-9144-2f511b42fcc2",
        "displayName": "small_talk.user.testing_agent"
      },
      "resolvedInput": "test",
      "matchType": "INTENT",
      "confidence": 1
    }
  },
  "responseType": "FINAL"
}
Match Intent
Request Body
{
  "queryInput": {
    "languageCode": "en",
    "intent": {
      "intent": "projects/vcu-virtual-assistant-bot/locations/global/agents/8ec51540-2933-43d6-aad5-355545059bfe/intents/335ebd4c-bb93-4ed1-bd4c-610789dbb7ea"
    }
  },
  "queryParams": {
    "timeZone": "America/Los_Angeles"
  }
}
Response Body
{
  "triggerIntent": "projects/vcu-virtual-assistant-bot/locations/global/agents/8ec51540-2933-43d6-aad5-355545059bfe/intents/335ebd4c-bb93-4ed1-bd4c-610789dbb7ea",
  "matches": [
    {
      "intent": {
        "name": "projects/vcu-virtual-assistant-bot/locations/global/agents/8ec51540-2933-43d6-aad5-355545059bfe/intents/335ebd4c-bb93-4ed1-bd4c-610789dbb7ea",
        "displayName": "additional-feedback"
      },
      "matchType": "DIRECT_INTENT",
      "confidence": 1
    }
  ],
  "currentPage": {
    "name": "projects/vcu-virtual-assistant-bot/locations/global/agents/8ec51540-2933-43d6-aad5-355545059bfe/flows/798f5699-958d-4fb2-abd5-2f16837b059f/pages/20f79bd5-019d-4f07-a64e-e6740122b731",
    "displayName": "additional-feedback"
  }
}
Fulfill Intent
Request Body
{
  "matchIntentRequest": {
    "session": "projects/vcu-virtual-assistant-bot/locations/global/agents/8ec51540-2933-43d6-aad5-355545059bfe/sessions/cd205a-958-7fc-5d5-0824cd93b",
    "queryInput": {
      "languageCode": "en",
      "intent": {
        "intent": "projects/vcu-virtual-assistant-bot/locations/global/agents/8ec51540-2933-43d6-aad5-355545059bfe/intents/335ebd4c-bb93-4ed1-bd4c-610789dbb7ea"
      }
    },
    "persistParameterChanges": true
  },
  "match": {
    "intent": {
      "name": "projects/vcu-virtual-assistant-bot/locations/global/agents/8ec51540-2933-43d6-aad5-355545059bfe/intents/335ebd4c-bb93-4ed1-bd4c-610789dbb7ea",
      "displayName": "additional-feedback"
    },
    "matchType": "DIRECT_INTENT",
    "confidence": 1
  }
}
Response Body
{
  "responseId": string,
  "queryResult": {
    object
    (QueryResult)
  },
  "outputAudio": string,
  "outputAudioConfig": {
    object
    (OutputAudioConfig)
  }
}
Webhooks
Request
{
  "detectIntentResponseId": "e8379fe3-5090-44be-8df4-a064b5ebb3dc",
  "intentInfo": {
    "lastMatchedIntent": "projects/vcu-virtual-assistant-bot/locations/global/agents/8ec51540-2933-43d6-aad5-355545059bfe/intents/00000000-0000-0000-0000-000000000000",
    "displayName": "Default Welcome Intent",
    "confidence": 1.0
  },
  "pageInfo": {
    "currentPage": "projects/vcu-virtual-assistant-bot/locations/global/agents/8ec51540-2933-43d6-aad5-355545059bfe/flows/00000000-0000-0000-0000-000000000000/pages/START_PAGE",
    "displayName": "Start Page"
  },
  "sessionInfo": {
    "session": "projects/vcu-virtual-assistant-bot/locations/global/agents/8ec51540-2933-43d6-aad5-355545059bfe/sessions/40e94b-779-70d-a9f-3e08ab3fe",
    "parameters": {
      "name": "ziggy fresh"
    }
  },
  "fulfillmentInfo": {
    "tag": "comm100-customfields"
  },
  "messages": [
    {
      "text": {
        "text": [
          "Greetings! How can I assist?"
        ],
        "redactedText": [
          "Greetings! How can I assist?"
        ]
      },
      "responseType": "HANDLER_PROMPT",
      "source": "VIRTUAL_AGENT"
    }
  ],
  "text": "hello",
  "languageCode": "en"
}
dialog flow simple request body
{
  "sessionInfo": {
    "parameters": {
      "item": "tshirt"
    }
  },
  "fulfillmentInfo": {
    "tag": "confirm"
  }
}
post request
curl -X POST -H "Authorization: Bearer $(gcloud auth print-access-token)" -H "x-goog-user-project: dialogflow-378918" -H "Content-Type: application/json; charset=utf-8" -d '{"queryInput": {"event": {"event": "custom-event"},"languageCode": "en"}, "queryParams": {"timeZone": "America/Los_Angeles"}}' "https://us-central1-dialogflow.googleapis.com/v3/projects/dialogflow-378918/locations/us-central1/agents/340fe3aa-6e96-4ac3-b61b-00c79bd55733/sessions/1ca764-0e7-a39-581-11093b511 :detectIntent"
Response Body
{
  "fulfillmentResponse": {
    "mergeBehavior": null,
    "messages": [
      {
        "text": {
          "text": [
            "This is a sample response."
          ]
        }
      }
    ],
    "ETag": null
  },
  "pageInfo": null,
  "payload": null,
  "sessionInfo": {
    "parameters": {
      "security-code": "jj444"
    },
    "session": null,
    "ETag": null
  },
  "targetFlow": null,
  "targetPage": null,
  "ETag": null
}
custom Webhook with rich text and chips
{
  "fulfillment_response": {
    "messages": [
      {
        "text": {
          "text": [
            "Please select anyone"
          ]
        },
        "payload": {
          "richContent": [
            [
              {
                "type": "chips",
                "options": [
                  {
                    "text": "Chip 1",
                    "image": {
                      "src": {
                        "rawUrl": "https://example.com/images/logo.png"
                      }
                    },
                    "link": "https://example.com"
                  },
                  {
                    "text": "Chip 2",
                    "image": {
                      "src": {
                        "rawUrl": "https://example.com/images/logo.png"
                      }
                    },
                    "link": "https://example.com"
                  }
                ]
              }
            ]
          ]
        }
      }
    ]
  }
}
- rich text custom buttons
{
  "richContent": [
    [
      {
        "type": "button",
        "icon": {
          "type": "chevron_right",
          "color": "#FF9800"
        },
        "text": "Button text",
        "link": "https://yoursite.org",
        "event": {
          "name": "",
          "languageCode": "en",
          "parameters": {}
        }
      }
    ]
  ]
}
In the webhookResponse
you can set the fulfillment_response and target_page fields to send a fulfillment response as well as transition to another page respectively.
Here’s an example below:
Here are possible ways to continue/resume a conversation by passing previously collected customer data from a previous conversation into a new conversation
You can create a custom implementation using a webhook wherein a function will store
the parameter and forms you
collected and use that to continue the chat from where
the user left off during a conversation flow or a session. In
the webhookResponse you can set the
fulfillment_response, target_page fields and session_info
field to update and send back the stored parameters you collected from the previous conversation.
Here’s an example of how to pass the session parameter, target page and fulfillment response from your webhook response:
{
  "sessionInfo": {
    "parameters": {
      "param1": {
        "value": "sample1"
      }
    }
  },
  "targetPage": "projects / <Project ID>/locations/<Location ID>/agents/<Agent ID>/flows/<Flow ID>/pages/<Page ID>",
  "fulfillment_response": {
    "messages": [
      {
        "text": [
          "This is where you left"
        ]
      }
    ]
  }
}
Custom Web Hooks
Resources
bot for front end calls i used
projects/dialogflow-378918/locations/global/agents/069075ae-67c3-4223-88cc-137335336001
bot for backend/function/cli calls i used
projects/dialogflow-378918/locations/global/agents/6b645750-50d1-42bc-be58-cc8489cc2f24
format for detectintent with session id
projects/<Project ID>/locations/<Location ID>/agents/<AgentID>/sessions/<Session ID>
- ex.
projects/dialogflow-378918/locations/global/agents/ab41f453-1740-49c5-b352-9f8017868355/sessions/dfMessenger-71737901
WELCOME intent/ Default start call intent
format
projects/<PROJECT_ID>/locations/<LOCATION_ID>/agents/<AGENT_ID>/intents/00000000-0000-0000-0000-000000000000ex.
projects/dialogflow-378918/locations/global/agents/069075ae-67c3-4223-88cc-137335336001/intents/00000000-0000-0000-0000-000000000000
CLI
test in API Console
- fyi
use OAuthPlayground
to get ACCESS TOKEN to testneed access token to test, but can set up function to have 0Auth already but using a service account or your own
curl call , with body to trigger event
curl -m 70 -X POST <https://global-dialogflow.googleapis.com/v3/projects/dialogflow-378918/locations/global/agents/069075ae-67c3-4223-88cc-137335336001/sessions/this_is_a_session_id_123456:detectIntent> --header 'Authorization: Bearer ya29.a0Ael9sCM7Gfk0D95ta0FAr2CR_fMUk1mjyY9RHHOp-KR7xAMR5AjP1p9XNvFrkKhyPjrzfa_Il0YdOcNPCDhtCzLODrgzIEqXR_YyW_FkQWYm8VYTHA2jHD49UMuqyh1WBqdZUe3ukkbwKTpQiIHb2AVc8h4TaCgYKASASARMSFQF4udJh_4KVLgiUV5Gcufk4KcK_WQ0163' --header 'Accept: application/json' --header 'Content-Type: application/json' --data '{"query_input":{"event":{"event":"initiate-bot-event"},"language_code":"en"},"queryParams":{"time_zone":"America/Los_Angeles"}}' --compressed
curl, call to trigger “WELCOME” event , or default start card
curl -m 70 -X POST <https://global-dialogflow.googleapis.com/v3/projects/dialogflow-378918/locations/global/agents/069075ae-67c3-4223-88cc-137335336001/sessions/this_is_a_session_id_123456:detectIntent> --header 'Authorization: Bearer ya29.a0Ael9sCM7Gfk0D95ta0FAr2CR_fMUk1mjyY9RHHOp-KR7xAMR5AjP1p9XNvFrkKhyPjrzfa_Il0YdOcNPCDhtCzLODrgzIEqXR_YyW_FkQWYm8VYTHA2jHD49UMuqyh1WBqdZUe3ukkbwKTpQiIHb2AVc8h4TaCgYKASASARMSFQF4udJh_4KVLgiUV5Gcufk4KcK_WQ0163' --header 'Accept: application/json' --header 'Content-Type: application/json' --data '{"queryInput":{"intent":{"intent":"projects/dialogflow-378918/locations/global/agents/069075ae-67c3-4223-88cc-137335336001/intents/00000000-0000-0000-0000-000000000000"},"languageCode":"en"},"queryParams":{"timeZone":"America/Los_Angeles"}}' --compressed
Events
EventHandler
EventInput
Agent Handoff
Select Live agent handoff from the Add dialogue option dropdown.
Add dialogue option dropdown menu
This will result in an area to provide a custom JSON message.
Live agent handoff text field
Every target live agent system is different. Refer to the system’s documentation as to what message format will be necessary to add to provide the
proper communication parameters.
As an example, if you’re using Business Messages, the format that you’d
enter here would look something like this:
{
“userStatus”: {
“requestedLiveAgent”: true
}
}
Copied!
Please check the Business Messages documentation for the precise JSON message.
For more information on Business Messages live agent handoff formats,
see Handoff from bot to live agent.
Agent Responses
Custom Payload
DialogFlow CX Doc
Testing
Select All Test checkboxes for Environment settings
for (let e of document.querySelectorAll("mat-option")) {
    e.click();
}
PostMan
Setup oauth2 DialogFlow example
Download and launch Postman.
Generate an OAuth 2.0 token
- From the GCP console (APIs & Services -> Library), ensure that the Dialogflow API is enabled
- Create an OAuth 2.0 client ID
- From the GCP console (API & Services -> OAuth consent screen)
- Add “getpostman.com” to the Authorized domains. Click Save.
- From the GCP console (API & Services -> Credentials)
- Select +Create Credentials -> OAuth client ID and choose Application type ‘Web application’.
- Name: ‘getpostman’
- Authorized redirect URIs: **
https://www.getpostman.com/oauth2/callback</strong>
- Select +Create Credentials -> OAuth client ID and choose Application type ‘Web application’.
- Copy the generated Client ID and Client secret fields for later use
- From the GCP console (API & Services -> OAuth consent screen)
- From Postman, create a new Request and select the “Authorization” tab and choose Type “OAuth 2.0”. Click ‘Get New Access Token’.
- Fill the GET NEW ACCESS TOKEN form as follows:
- Token Name: ‘Google OAuth getpostman’
- Grant Type: ‘Authorization Code’
- Callback URL:
https://www.getpostman.com/oauth2/callback - Auth URL:
https://accounts.google.com/o/oauth2/auth - Access Token URL:
https://accounts.google.com/o/oauth2/token - Client ID: generated in the Step 2 (e.g., ‘111111111111-aaaaaaaaaaa1234546789blablabl12.apps.googleusercontent.com’)
- Client Secret: generated in the Step 2 (e.g., ‘ABRACADABRAus1AAAAvq9R-A’)
- Scope: https://www.googleapis.com/auth/dialogflow
- State: Leave empty
- Client Authentication: “Send as Basic Auth header”
- Click ‘Request Token’ and ‘Use Token’
Send GET request to Dialogflow API
- See the Dialogflow API Rest reference for the full list of APIs you can
query. - From Postman, enter the API you want to query in the GET field. In this example, we want to get a list of all the Intents for this Dialogflow
Agent. Be sure to replace this Project ID
‘ai-assisted-student’ with your Project ID.

- Click the “Send” button. You should see the query results in the Response Body:

Send POST request to Dialogflow API
- Now let’s try a POST request. For this example, we want to use the detectIntent API by providing a query text in our request of what our intention
is and the agent will “detect” our intention by
matching one of our agent Intents. - From the drop down, change the request type to “POST” and enter the appropriate HTTP request. Do not click the “Send” button just yet. Be sure
to replace this Project ID
‘ai-assisted-student’ with your Project ID.

- Now we want to include a JSON payload with our query text as input. Under the POST field, select “Body->raw->Text” and from the drop down, choose
“JSON”. - Enter the appropriate JSON payload details from the Dialogflow API documentation (see
this example).

- Now click the “Send” button. In the response body, you should see that your query input (in this example, “is the cafe open”), is matched with the
appropriate Intent and the fulfillment text
response provides our agent answer to the question.
